Showing posts with label salt. Show all posts

Wednesday, 4 September 2019

Late Night Baked Frittata


During one of those late-night mother and son conversations yesterday about how nice the frittata was at the Kendal People's Cafe / PopUp Repair Workshop at the Castle Street Centre in Kendal, the son grinned and said, "frittatas are easy" and promptly vanished into the kitchen to make one.

He normally makes them in a cast iron frying pan on the stove, but this time he wanted to try a baked in the oven version to see how it worked.

Mother was drafted in to help: chopping onion and long red pepper into small pieces ready for a quick softening fry in the pan, and to crack eggs into the bowl without dropping the shell in as well (she failed!)

Son tackled the potatoes - nice fresh redskins that were just washed and sliced thinly, no need to peel them.

The end result was very tasty and proved that, yes, you can make frittata in the oven! Here's how...

Ingredients

800g of potatoes, washed and thinly sliced
9 eggs
1 large onion, finely chopped
½ long red pepper, finely chopped
approx 10cm of Aldi spicy chorizo or equivalent
Olive oil to fry the onion, pepper and chorizo in to start with
A couple of dashes of Cholula Chipotle sauce
Salt and pepper (optional)

Method

Firstly, put the olive oil into a frying pan and shallow fry the onion, pepper and chorizo for around 3 minutes or so, adding the cholula sauce and making sure everything is hot through.

Crack the eggs into a jug or bowl and lightly mix with a fork to break up the yolks.

In a large mixing bowl combine the sliced potatoes and the contents of the frying pan, pour mixture into a large baking dish (ours is approx 28cm x 17cm). Level it down, then pour the eggs over the mixture. Sprinkle a pinch of salt on the top (only a little!).

Bake in oven on Gas Mark 4 for 100 minutes (1hr 20mins).  Remove from oven and lightly sprinkle a small amount of black pepper over the surface, cut into portions and serve hot.

Serves 4 as a main course or 8 as a side dish.


Wednesday, 4 April 2018

Alex's Tuna Pasta Bake (dairy free)

Al's has been experimenting in the kitchen. That's a good sign! His dairy intolerance hasn't gone yet, so he's been trying out a dairy free tuna pasta bake recipe he devised. I have to say it looked and smelled delicious!  It disappeared too quickly for me to have more than a test forkful... next time he makes it I'll stand there with my bowl held out before me like Oliver Twist!


Here's his recipe...

Dairy-Free Tuna Pasta Bake

Ingredients

150g dried spiral pasta
125g mixed vegetables (can be frozen)
100g mushrooms, finely chopped
4 sun-dried tomato halves
1 tin of tuna (112g drained weight), flaked
1 tin of anchovies (30g drained weight), finely chopped
2 cloves of garlic, crushed
One box of Panko breadcrumbs (70g weight)
80g of dairy-free spread
1/4 cup of plain / all-purpose flour
2 cups of soya milk
Olive oil for frying (about two tablespoons)
Pinch of salt

Method

1: Pre-heat oven to 200C / Gas Mark 6 and grease a 4-cup capacity baking dish that is about 6 cm (2 to 3 inches) deep.

2: Find yourself a large bowl to put everything into as it's done, adding the tuna initially.

3: Put the pasta and the pinch of salt into a saucepan, add boiling water and cook until tender. You don't want it fully cooked, just about half-way there. If using fresh vegetables then add them towards the end to heat through, if frozen then go ahead and add them at the start. Drain the whole lot once it is cooked and put it into the big bowl you found in step 2.

4: While the pasta is cooking, heat some of the oil in a frying pan and fry off the mushrooms and dried tomatoes for four or five minutes until the mushrooms are softened. Once done, scoop the mushrooms and tomatoes into the bowl from step 2.

5: Put the garlic and anchovies into the frying pan, adding more oil if needed, and fry them for about a minute to get the flavours going then take the pan off the heat and add the breadcrumbs to the pan, mixing well.

6: Into a saucepan (the empty one you did the pasta in if your really organised!) put the spread and melt it over a medium heat before adding the flour to make a roux. Cook it for a minute or so and then gradually add the soya milk, stirring or whisking as you go. Once it's all mixed together, bring the pan up to a boil and then reduce the heat to medium-low and simmer the sauce for about five minutes or until it thickens up. You will want to keep stirring gently here to avoid it developing a skin.

7: Once the sauce is ready, pour it into that bowl from step 2 which contains the pasta, vegetables and tuna and mix the whole lot together. Once well mixed, spoon or pour the mixture into the greased baking dish from step 1 and top it off with the breadcrumb mix from step 5.

8: Put the filled baking dish into the pre-heated oven for about 20 minutes or until the breadcrumbs go golden. Can be eaten right away or later on! Should serve 2 to 3 depending on appetite, more if you have a side dish with it.


Wednesday, 5 October 2016

Post-midnight Hummus making (V)

A couple of nights ago I had a hankering for hummus. I blame my son for this - he introduced me to hummus and I've been hooked ever since. We've been trying various types from the local supermarkets, but we wanted to try and make our own as our village shopkeeper, who is Greek, told us it was easy to do.

Our first attempt some weeks ago was a bit of a failure. It was too runny and the flavour was all wrong. Then came the hankering and no hummus in the fridge - what to do?

Finding a recipe online - one of those really helpful ones with a video so you can see what it's supposed to look like as you make it - I went raiding the pantry for the needed ingredients. I knew we had chickpeas - tinned ones from ALDI as I use them for stews and bean burgers. Tahini - yes we had that - two jars reduced to £1 a jar in Tesco a few weeks ago and dated late 2017 so still fine to use. Olive oil - yes, it's the only oil we use for cooking. Fresh lemon juice - no, but we usually have a bottle of lemon juice and one of lime juice in the fridge (both from my local ALDI), garlic, cumin and salt from the spice rack and I was ready to experiment again.

I was a bit worried as the recipe said it used a food processor to mix things up, and we don't have one. Initially I used the potato masher on the drained and rinsed chickpeas until they were all nicely mashed and lump-free, but discovered that using the end of a sturdy wooden rolling pin in a large flat-based bowl worked even better for mashing them (think large pestle and mortar!)  The tahini and citrus juice (half lemon, half lime) I mixed using a wooden spoon - it really doesn't need much effort as it goes very quickly after a minute's beating with the spoon. Once the tahini and citrus was mixed, the olive oil and the spices went in, followed by the chick peas, and it was all mixed by hand for a couple of minutes.

A taste test showed it needed a bit more seasoning, so my son went rummaging and found a tub of Tesco's Tikka curry powder and a bottle of chipotle sauce, so we added some of each (1 tsp of each approx.) and a small pinch of salt (we use sea salt for preference, but any salt works. Just don't add too much!)

The result was very tasty hummus in less than half an hour, which we spread liberally onto warm seeded paninis and thoroughly enjoyed at two in the morning!


Our final recipe:

1 400g can chickpeas, drained and well-rinsed
¼ cup (60 ml) fresh lemon juice (1 large lemon)
¼ cup (60 ml) well-stirred tahini
2 garlic cloves, minced (use 1 clove if you prefer a milder garlic flavour)
2 tablespoons (30 ml) extra-virgin olive oil
½ teaspoon ground cumin
Pinch of sea salt
1 teaspoon Tikka curry powder *
Dash of ground paprika and a little olive oil, for serving if liked

* If you want to make your own there is a recipe here: 
http://www.food.com/recipe/tikka-spice-mix-2654

Method:

In a bowl mix the tahini and lemon juice for around 1 minute, using a wooden spoon, until mix changes colour and goes lighter and a bit fluffy looking. 

Add the 2 tbsp's olive oil, the minced garlic, cumin, curry powder, chipotle sauce, and the sea salt to the whipped tahini and lemon juice (you can substitute a ½ teaspoon of table salt instead of sea salt if you prefer it.)

In a 2nd bowl put the chickpeas and mash them until there are no whole peas or lumps visible, then add the chickpeas to the tahini mix and combine well until you have a creamy mixture. 

You can eat it immediately, or leave it in the bowl in the fridge for an hour to let the best flavour develop. 

Wednesday, 18 November 2015

No need bread!

"What do you mean, no need bread? Of course we need bread!" was our response to this. It soon became apparent that it wasn't no need, but was in fact no-knead, bread!


A friend over on Facebook was explaining that her hubbie had become smitten with bread-making after finding the no-knead bread method, so we decided we had to check this out for ourselves. Armed with the link we watched the video tutorial on TimesVideo and then wrote out the basic recipe and headed for the kitchen... the recipe comes from Jim Lahey at the Sullivan Street Bakery in Manhattan (USA) and uses just flour, water, yeast and salt... and no kneading!

Here is the basic recipe we used:

3 cups plain flour (not strong or bread flour, just normal plain flour)
¼ teaspoon of dried yeast (ours is The Pantry own brand from ALDI)
1¼ teaspoons salt
1½ cups tepid water

Put the flour, yeast and salt in large bowl, mix together. Make a well in the centre of the dry mix, pour in the water, mix the dry stuff into the water until it makes a dough. In the video Jim used his hands for this, but we found it was a claggy sticky process, so experimented a bit and found a flat bladed dinner knife worked best as a mixing tool.  It only took a minute or two to mix, so not too onerous.

Once the dough was well mixed, we put the bowl into a warm spot - we set ours on a chair next to the radiator - with a towel wrapped round the bowl, and a clean tea towel over the top, then to keep in the heat we spread 3 or 4 more thick hand towels over the top of the bowl so the top and sides were well-covered.

We left the covered bowl in its warm spot for around 14 hours, then cautiously lifted the covers and peered inside. The dough was beautifully bigger! At least twice the size, heading for three times the size of the original dough.

Next we pre-heated the baking tin. We used a very heavy 10" diameter Le Creuset casserole pan with lid, a gentle wipe round the inside of the pan with a bit of olive oil on some kitchen roll just to prevent sticking, then we popped the pan (without its lid) into the oven and let it heat up. The oven was on maximum - the video says 500F degrees, but ours only goes to Gas Mark 8 which is around 450F degrees but what the heck! We left the pan to heat up for around 15 minutes.

Meanwhile the dough was lifted from the bowl and put onto a floured board and made into a ball shape, then flattened a bit, folded over, dusted with flour, turned upside down and dusted again with flour, then dropped into the pre-heated oven pan, and the lid popped on.

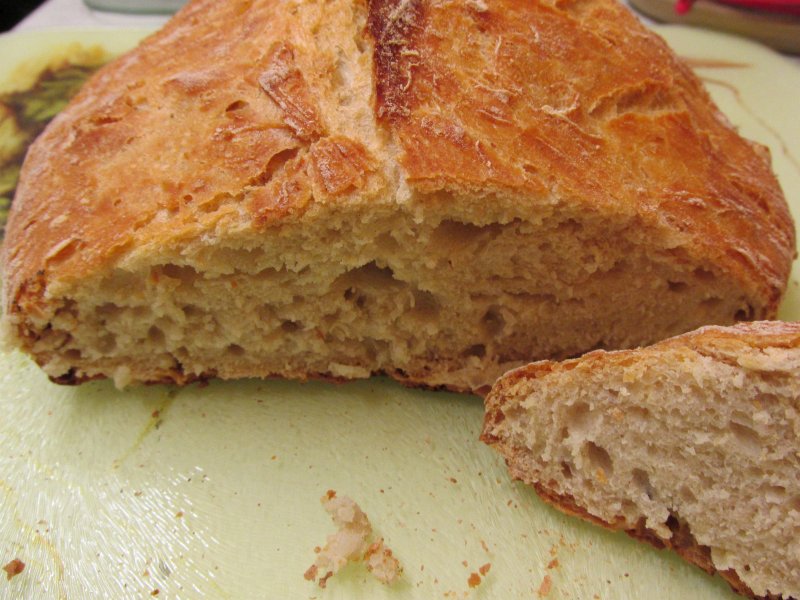
Back into the oven it went, still on full, for around 55 minutes. In fact we should have lifted the lid after about 30 minutes and finished it off open topped, but we forgot to do that! It obviously didn't do any harm, as when we lifted the pan from the oven and removed its lid, the bread looked amazing!

After letting it cool enough so the heat didn't fog the camera lens, we took photos, and then sampled it. What wonderful bread! It would be fab with home-made soup, but very enjoyable as I had it, just smeared with butter.

Our next attempt will involve a double quantity, a much larger baking pan, and possibly sun-dried tomatoes and olives... watch this space!


 Edited to add for clarity: Gas Mark 8 equates to 450 degrees Fahrenheit or 230 degrees Celsius